准备
请按照上一节:Swoole实验室:1-使用Composer构建项目,构建好项目。并使用composer安装邮件发送组件:phpmailer。
composer require phpmailer/phpmailer
主程序
在目录:src/App/下建立Mail.php,用作Swoole服务端主程序。
<?php
namespace Helloweba\Swoole;

use swoole_server;
use PHPMailer\PHPMailer\PHPMailer;
use PHPMailer\PHPMailer\Exception;

class Mail
{
    protected $serv;
    protected $host = '127.0.0.1';
    protected $port = 9502;
    // 进程名称
    protected $taskName = 'swooleMailer';
    // PID路径
    protected $pidPath = '/run/swooleMail.pid';
    // 设置运行时参数
    protected $options = [
        'worker_num' => 4, //worker进程数,一般设置为CPU数的1-4倍
        'daemonize' => true, //启用守护进程
        'log_file' => '/data/logs/swoole.log', //指定swoole错误日志文件
        'log_level' => 0, //日志级别 范围是0-5,0-DEBUG,1-TRACE,2-INFO,3-NOTICE,4-WARNING,5-ERROR
        'dispatch_mode' => 1, //数据包分发策略,1-轮询模式
        'task_worker_num' => 4, //task进程的数量
        'task_ipc_mode' => 3, //使用消息队列通信,并设置为争抢模式
        //'heartbeat_idle_time' => 600, //一个连接如果600秒内未向服务器发送任何数据,此连接将被强制关闭
        //'heartbeat_check_interval' => 60, //启用心跳检测,每隔60s轮循一次
    ];
    // 邮件服务器配置
    protected $mailConfig = [
        'smtp_server' => 'smtp.163.com',
        'username' => 'example@163.com',
        'password' => '',// SMTP 密码/口令
        'secure' => 'ssl', //Enable TLS encryption, `ssl` also accepted
        'port' => 465, // tcp邮件服务器端口
    ];
    // 安全密钥
    protected $safeKey = 'MYgGnQE33ytd2jDFADS39DSEWsdD24sK';


    public function __construct($mailConfig, $options = [])
    {
        // 构建Server对象,监听端口
        $this->serv = new swoole_server($this->host, $this->port);

        if (!empty($options)) {
            $this->options = array_merge($this->options, $options);
        }
        $this->serv->set($this->options);

        $this->mailConfig = $mailConfig;

        // 注册事件
        $this->serv->on('Start', [$this, 'onStart']);
        $this->serv->on('Connect', [$this, 'onConnect']);
        $this->serv->on('Receive', [$this, 'onReceive']);
        $this->serv->on('Task', [$this, 'onTask']);
        $this->serv->on('Finish', [$this, 'onFinish']);
        $this->serv->on('Close', [$this, 'onClose']);

        // 启动服务
        //$this->serv->start();
    }

    protected function init()
    {
        //
    }

    public function start()
    {
        // Run worker
        $this->serv->start();
    }

    public function onStart($serv)
    {
        // 设置进程名
        cli_set_process_title($this->taskName);
        //记录进程id,脚本实现自动重启
        $pid = "{$serv->master_pid}\n{$serv->manager_pid}";
        file_put_contents($this->pidPath, $pid);
    }

    //监听连接进入事件
    public function onConnect($serv, $fd, $from_id)
    {
        $serv->send($fd, "Hello {$fd}!" );
    }

    // 监听数据接收事件
    public function onReceive(swoole_server $serv, $fd, $from_id, $data)
    {
        $res['result'] = 'failed';
        $key = $this->safeKey;

        $req = json_decode($data, true);
        $action = $req['action'];
        $token = $req['token'];
        $timestamp = $req['timestamp'];

        if (time() - $timestamp > 180) {
            $res['code'] = '已超时';
            $serv->send($fd, json_encode($res));
            exit;
        }

        $token_get = md5($action.$timestamp.$key);
        if ($token != $token_get) {
            $res['msg'] = '非法提交';
            $serv->send($fd, json_encode($res));
            exit;
        }

        $res['result'] = 'success';
        $serv->send($fd, json_encode($res)); // 同步返回消息给客户端
        $serv->task($data);  // 执行异步任务

    }

    /**
    * @param $serv swoole_server swoole_server对象
    * @param $task_id int 任务id
    * @param $from_id int 投递任务的worker_id
    * @param $data string 投递的数据
    */
    public function onTask(swoole_server $serv, $task_id, $from_id, $data)
    {
        $res['result'] = 'failed';
        $req = json_decode($data, true);
        $action = $req['action'];
        echo date('Y-m-d H:i:s')." onTask: [".$action."].\n";
        switch ($action) {
            case 'sendMail': //发送单个邮件
                $mailData = [
                    'emailAddress' => 'abc@example.com', //接收方,改成自己的邮箱可以测试接收邮件
                    'subject' => 'swoole实验室',
                    'body' => '测试This is the HTML message body <b>in bold!</b>,<br/>欢迎访问<a href="https://www.helloweba.net/">www.helloweba.net</a>',
                    'attach' => '/home/swoole/public/a.jpg'
                ];
                $this->sendMail($mailData);
                break;

            default:
                break;
        }
    }


    /**
    * @param $serv swoole_server swoole_server对象
    * @param $task_id int 任务id
    * @param $data string 任务返回的数据
    */
    public function onFinish(swoole_server $serv, $task_id, $data)
    {
        //
    }


    // 监听连接关闭事件
    public function onClose($serv, $fd, $from_id) {
        echo "Client {$fd} close connection\n";
    }

    public function stop()
    {
        $this->serv->stop();
    }

    private function sendMail($mail_data = [])
    {
        $mail = new PHPMailer(true);
        try {
            $mailConfig = $this->mailConfig;
            //$mail->SMTPDebug = 2;        // 启用Debug
            $mail->isSMTP();   // Set mailer to use SMTP
            $mail->Host = $mailConfig['smtp_server'];  // SMTP服务
            $mail->SMTPAuth = true;                  // Enable SMTP authentication
            $mail->Username = $mailConfig['username'];    // SMTP 用户名
            $mail->Password = $mailConfig['password'];     // SMTP 密码/口令
            $mail->SMTPSecure = $mailConfig['secure'];     // Enable TLS encryption, `ssl` also accepted
            $mail->Port = $mailConfig['port'];    // TCP 端口

            $mail->CharSet  = "UTF-8"; //字符集
            $mail->Encoding = "base64"; //编码方式

            //Recipients
            $mail->setFrom($mailConfig['username'], 'Helloweba'); //发件人地址,名称
            $mail->addAddress($mail_data['emailAddress'], '亲');     // 收件人地址和名称
            //$mail->addCC('hellowebanet@163.com'); // 抄送

            //Attachments
            if (isset($mail_data['attach'])) {
                $mail->addAttachment($mail_data['attach']);         // 添加附件
            }

            //$mail->addAttachment('/tmp/image.jpg', 'new.jpg');    // Optional name

            //Content
            $mail->isHTML(true);                                  // Set email format to HTML
            $mail->Subject = $mail_data['subject'];
            $mail->Body    = $mail_data['body'];

            $mail->send();
            return true;
        } catch (\Exception $e) {
            echo 'Message could not be sent. Mailer Error: '. $mail->ErrorInfo;
            return false;
        }
    }

}
Swoole启动后,服务端会监听数据接收事件onReceive(),当接收到客户端发来的数据时会进行相应的处理。我们在这里对源数据进行验证,然后作为任务投递给onTask()。sendMail()是使用phpmailler来发送邮件的,这里可以参考使用PHPMailer发送带附件并支持HTML内容的邮件。
运行服务端
在public/目录下建立mailServer.php,代码如下:
<?php
require dirname(__DIR__) . '/vendor/autoload.php';

use Helloweba\Swoole\Mail;

$config = [
    'smtp_server' => 'smtp.163.com', //邮件服务器
    'username' => 'xxxxx@163.com', //这里是用作发送方的邮箱号
    'password' => 'xxxxx',// SMTP 密码/口令
    'secure' => 'ssl', //Enable TLS encryption, `ssl` also accepted
    'port' => 465, // tcp邮件服务器端口
];
$server = new Mail($config);
$server->start();
你可以注册一个163邮箱,然后开通smtp功能。我DEMO中使用的是163邮箱发邮件发多了被封号了,所以在线演示demo没上传了。配置好邮件服务器参数后,运行:
php mailServer.php此时再使用命令netstat -lntp查看进程:
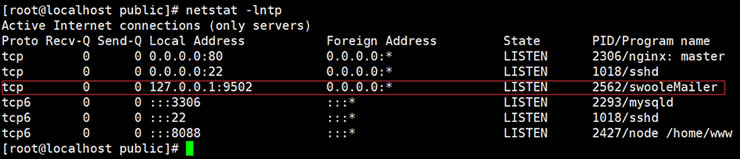
当你看到已经在监听9502端口时,我们的swoole邮件服务端就已经启动好了。
运行客户端
在public/目录下新建mailClient.php,代码如下:
<?php
class Client
{
    private $client;

    public function __construct() {
        $this->client = new swoole_client(SWOOLE_SOCK_TCP);
    }

    public function connect() {
        if( !$this->client->connect("127.0.0.1", 9502 , 1) ) {
            echo "Error: {$this->client->errMsg}[{$this->client->errCode}]\n";
        }

        $action = 'sendMail';
        $time = time();
        $key = 'MYgGnQE33ytd2jDFADS39DSEWsdD24sK';
        $token = md5($action.$time.$key);
        $data = [
            'action' => $action,
            'token' => $token,
            'timestamp' => $time
        ];
        $msg = json_encode($data);

        $this->client->send( $msg );
        $message = $this->client->recv();
        echo "Get Message From Server:{$message}\n";
    }
}

$client = new Client();
$client->connect();
运行命令启动客户端:
php mailClient.php
此时在命令行窗口会返回如下信息:
[root@localhost public]# php mailClient.php
Get Message From Server:{"result":"success"}
这样就已经执行邮件发送任务了,如果出现故障,可以查看日志文件/data/logs/swoole.log。
小结
本节是一个简单的单一邮件发送例子。由Swoole客户端提交发送邮件的指令到Swoole服务端,服务端接收到需要发送邮件的指令后,调用邮件发送服务来发邮件的。由于发送邮件可能比较耗时,不同的邮件服务器发送耗时也不一样,经测试单个邮件发送一般在1秒内完成,这个如果在web页面上发送是可以接受的,但是使用Swoole来发送的话我们提交发送指令就不用管结果了,Swoole在后台自己进行发送邮件。如果是大批量发送大量邮件时,我们可以使用Swoole+队列的方案,下节我们来测试批量队列发送邮件,敬请关注。

共1条评论
比较好,学习了swoole的使用场景